

The Ghostbusters hold their ghosts into a Containment Unit. I, too, needed a container for my hologram ghost. Lucky for me, mine didn’t raise the ire of the EPA.
The Unity project was in good shape. Video of myself as a ghost played as expected. My voice commands were being read properly by the game. I playtested extensively, answering the ghost version of myself with “yes,” “no,” and every so often “fart” to try and trip it up. (It didn’t work.) The new version of the software worked, but I knew that was only half the battle.
To make a complete, working demo, the game needed an enclosure with a Pepper’s Ghost effect. This was the part that made me most nervous. When I was making this project with Shing, they were going to handle the propmaking. Now I would be spending money to buy actual hardware, something I know a lot less about. I am no propmaker, and I worried I’d be a prop-breaker!
There was one piece of hardware I already had. A few months ago, Amanda ordered an IKEA cart which included a new shelving unit for the mudroom and containers for organizing the fridge. (We are determined to tame the wildest elements in our home: shoes and food.) As a surprise, she bought me a glass dome display case. I asked her why she got it and she said it was for my hologram ghost. At this moment, I hadn’t thought about the project for a while, so it got my gears turning again. Yes, a dome like this would make sense for the Pepper’s Ghost. Something akin to Madame Leota’s crystal ball, only from IKEA. Disney would never use props from IKEA! (They get them off Redbubble, lol.)
I went to work sourcing the different parts. In my theme park class, I imagined the game would run on a cheap Raspberry Pi, but that would mean building the game in something Linux-compatible like WebGL. My experience building in WebGL is that my games work perfectly on Mac and PC, then comes out like a hideous sewer mutant in WebGL. There are always tons of extra bugs and visual discrepancies, like a UI element that looks super stretched out or a video that just doesn’t play. So I decided to shell out for a recommended mini-PC (the GMKtec G5), which was reasonably cheap and allowed me to run the game on PC. There were other parts I’d need, too, like a tiny 4 inch monitor that would fit within the base of the jar. (Due to poor math skills, I somehow convinced myself a 5 inch monitor would fit. After measuring the jar again, I hurriedly cancelled my order for the 5 inch monitor!) I would also need a microphone and speaker. Lots of gear!
Before I ordered all the gear, I realized I would have a problem. The tech would not fit comfortably in the case Amanda got me. No matter what, I would have to carve a hole in the stainless steel and Polypropylene base to run wires out of it for power and connectivity. That is exactly the kind of work I hoped to avoid. I don’t have the tools or expertise to drill holes through Polypropylene. I barely know what Polypropylene is. All I could imagine was using my cordless drill on the base, but due to my incorrect technique, the base comically launches into the kitchen, where it would spin out of control and destroy my collection of Muppet glassware. No, no, no. What I needed was a box to replace the base. A box could store the PC and audio peripherals and on top would rest the glass dome.
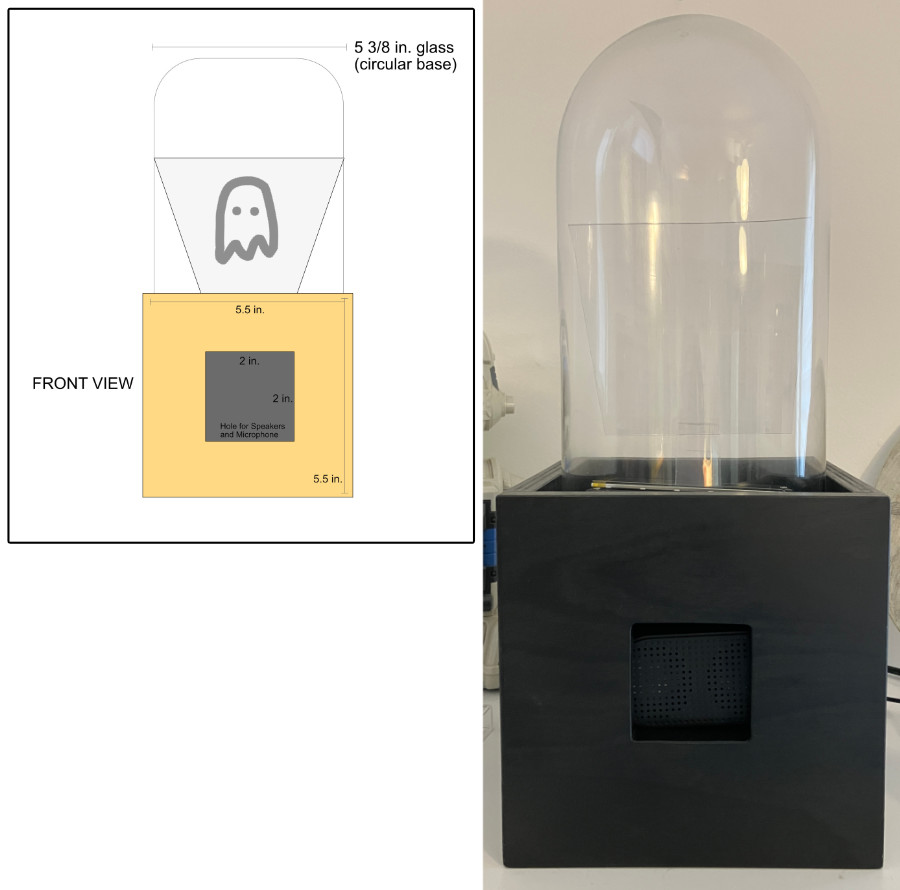
In 2026, I tend to think of the internet as a cruel, destructive, and unbearable place. But the internet still brings me moments of joy every so often. Case in point: finding a custom wooden box maker on Etsy. Karl from Li’l Wood Things is someone I would recommend for your custom wooden box needs. He’ll make a wood box to your specifications, even adding extras like a hinged door or engraved letters. I opened up Affinity Photo and started designing the specifications for the box, taking into account the diameter of the glass dome and the size of the Mini-PC and audio equipment. In the end, I came up with schematics for a 5.5 inch box with a door, holes from running cables, and a recessed top to hide the monitor. When he asked how I wanted it finished, I asked for it to be painted black. The Pepper’s Ghost effect works best in the dark. The less visible the box is, the more “floaty” the ghost will feel.
The box arrived just a week after I ordered it. I thought it would take a month. Go Karl! You are a one man box factory! The box was perfect, exactly like I imagined it. He even carved a recessed circle on the top of the box, which fit the glass dome securely. I loved the process of designing a custom physical object, then getting it back from the artisan. I’ve never felt closer to being an imagineer.
Next, I pulled the trigger on the cart with all the hardware. Those pieces arrived a few days later. There were a lot of steps to complete. First, I hooked up the tiny monitor to the mini-PC. Thankfully, they worked together. The monitor just barely fit inside the glass case. So glad I double-checked my measurements and cancelled the 5 inch monitor! It rested inside the case at an awkward angle, because the stiff HDMI cable connecting the monitor to the mini-PC pushed the monitor into a tilt. There was a bigger problem, as well. The mini-PC only has one USB-C port, which is used for power. The wireless microphone I purchased also required a USB-C port and my splitter didn’t work. So I borrowed my desk microphone to run tests.
Oh yeah, and the program wouldn’t run, because the computer thought it contained thousands of viruses. I’ve run into that issue before. The game ran if I chose to run the program as an “administrator,” which bypasses the safety checks.
Cutting the acrylic sheet took a lot of trial and error. The sheet itself was cut easily with scissors, but I had a difficult time finding a size that fit the case and laid at an angle to properly reflected the monitor. I simultaneously needed the sheet to be smaller and taller. Eventually, I made an acrylic stand to prop the small sheet up higher and taped the two pieces together with Scotch tape. Good enough!
Issues aside, the darn thing worked! The monitor and PC worked well together. The voice recognition worked reasonably well. There was a holographic ghost in front of me that I could talk to! By the time I was finished, it was the evening and dark in the dining room. The darker the room, the better the effect looked. And I couldn’t believe the effect worked at all.
After all these years, there it was in front of me. A voice activated hologram ghost! No proton pack required.
🎲 Your Turn: Have you ever worked with contractors on your projects? What did you had made? Did it work out? Are you more of a plan-it-out creator or a do-it-on-the-fly creator? I’d love to hear from you! Reply directly to this email or hit the orange comment below.
Leave a Reply